 Recycle bin helps us deleting files using drag & drop. But the view of the desktop must be free, or else it is annoying.
But if you can place the taskbar in an always visible area, that is, on the left side of your taskbar (quick launch bar), you will always have access to it. So you can easily drag & drop files into it to delete.
In Windows XP and Vista you can do this very easily by just dragging and dropping the recycle bin to the quick launch bar.

1. Before doing that, right click on the taskbar and uncheck ‘Lock the Taskbar’. Enable Quick Launch bar, if not enabled (Right click on the Taskbar – Toolbars – Quick launch bar)
2. If you have many items on the quick launch bar, drag the Separator (vertical bar) to the right side to accommodate the recycle bin.
3. Finally right click on the taskbar and check ‘Lock the taskbar’.
However in Windows 7 you have needed some other tricks to place the recycle bin to the taskbar. Do as described below.

1- Right click on the taskbar and uncheck ‘Lock the Taskbar’
2- Now create a new folder on your desktop and name it you like (Right click, select New and Folder) and Drag & drop the Recycle Bin on it.
3- Right click on the taskbar and select Toolbar - New toolbar. Navigate to the New Folder just created and select it and click on the Select Folder button.
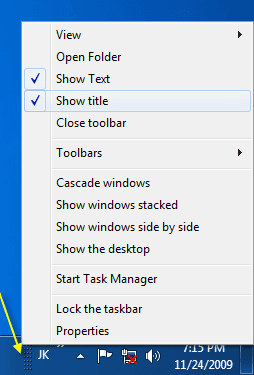
4- Now you can see a new Toolbar and a Separator (see image below) on the taskbar.
5- Right click on the Separator and uncheck Show Text and Show Title, and also select View and Large Icons by right clicking on the Separator


6- Now left click on the ‘Separator’ and drag it to the left side of the taskbar.
7- Finally right click on the Taskbar and check ‘Lock the Taskbar’
However, you must take care that the mouse key is released exactly above the recycle bin, or else an additional shortcut will be created on the quick launch bar.
Nice, but I don't need it. I usually delete a file by clicking the delete button.
ReplyDelete